If I would have to describe myself in one word it would be dreamy. Since I was a child I got lost in books or my own thoughts no matter where I was. At school this proved a problem, as I was often not following the lessons but instead watching the birds in the trees outside the window or thinking about something I read or made up in my head.
I would never walk to school, I would fly on my Pegasus, or imagine myself a mermaid swimming in the sea.
I cannot recount the times I traveled to Mordor with Frodo and Samwise to destroy the ring, or how many times I journeyed with Roland Deschain in search of the Dark Tower.
Being thus a very dreamy and imaginative Person I rely much on intuition and gut feeling. Therefore doing soap designs that don´t require much planning always work more easily for me.
Lucky me February’s soapchallenge features a technique that also relies on imagination and intuition, although the practical part of the challenge also requires a great deal of craftsmanship.
The theme of this months challenge is the Kiss Pour technique. The design derives from acrylic painting where Olga Soby was the first to layer colors of acrylic paint in two containers and pouring them on a canvas. The effect of the design comes from the two streams of color kissing each other whilst they are poured from the containers.
The effect you get when doing the technique the right way are fine feathers of different colors.
Joanne Watkins was the first to master this technique with soap, and so she was our guest teacher for the challenge.
In order the use the kiss pour with soap there are some things to consider.
The soap has to be very thin trace when poured, this requiring the use of a well behaving fragrance in order to get all the preparations done and still maintaining a very fluid soap once you are ready to pour.
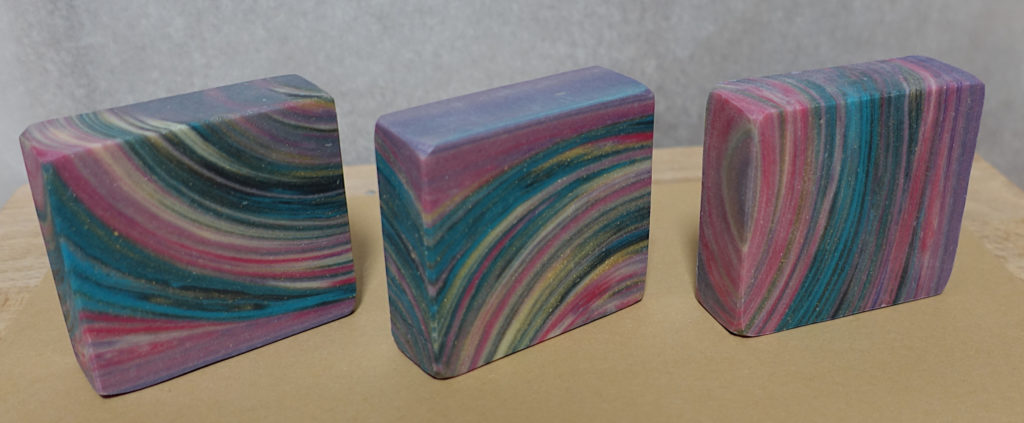
I decided to try the kiss pour with six different colors, black, green, purple, orange, red and white.
I used my standard shower soap recipe with 8% superfat and lots of cocoa and shea butter as well as olive oil. The mold was required to be a slab mold, and as I am a very crazy and confident person I used my big 10 pounds slab mold, hoping to get lots of beautiful soaps.
I am a fan of the heat transfer method so I used the hot lye solution to melt my hard butters and oils. This way I gain a lye butter mix that has about 45°C when everything is melted. Then I added the liquid oils and kaolin clay to my mix getting my soap temperature to around 36°C . I used one short burst of the stick blender to get everything together and then added a mixture of rosemary, peppermint, lavender and rosewood essential oils.
Afterwards I separated the soap into 6 equal parts and stirred in my colorants. Then I layered black, green and purple in one pouring container and white, red and orange in another.
This whole procedure took about 10 minutes from the moment I reached emulsion in my soap.
The pour itself was going smoothly , although holding 5 pound of soap in each hand and pouring a thin and steady stream of soap was really hard and took all my strength.
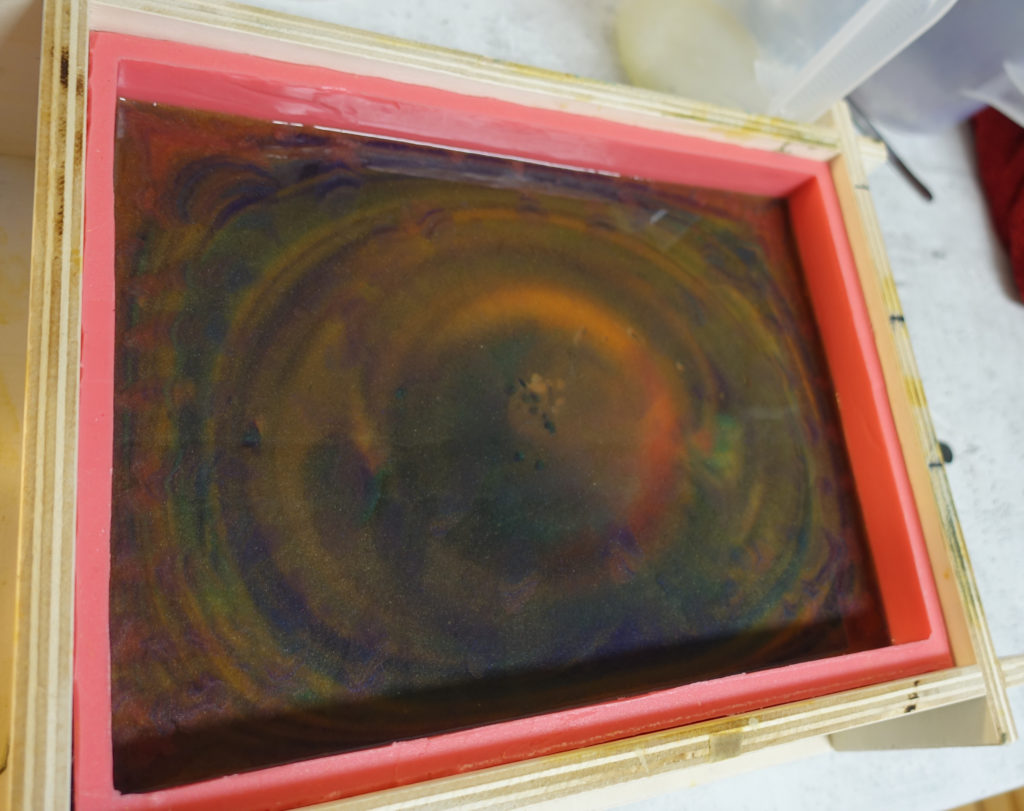
In the picture above you can see the soap after the pour. It looked a bit muddy but a close look revealed very thin lines of different colors. Also I was confident that planing the soap would further help the design to be revealed.
Then the long wait started. Due the very thin trace, and the used essential oils it took the soap almost 24 hours to reach gel phase. Usually when using this soap recipe the soap goes through gel phase within 12 hours and can be unmolded.
However I remained patient and unmolded the soap after 36 hours. Cutting the soap in three equal parts showed the wonderful feathering I had achieved.
After cutting the soap in three loaves I cut equal parts out of the loaves and then cut the soap horizontally to get a total of 24 kiss pour soaps with a otherworldly look.
I immediately thought about space and galaxies as I saw the final outcome of the design, but it was my husband who came up with the final name.
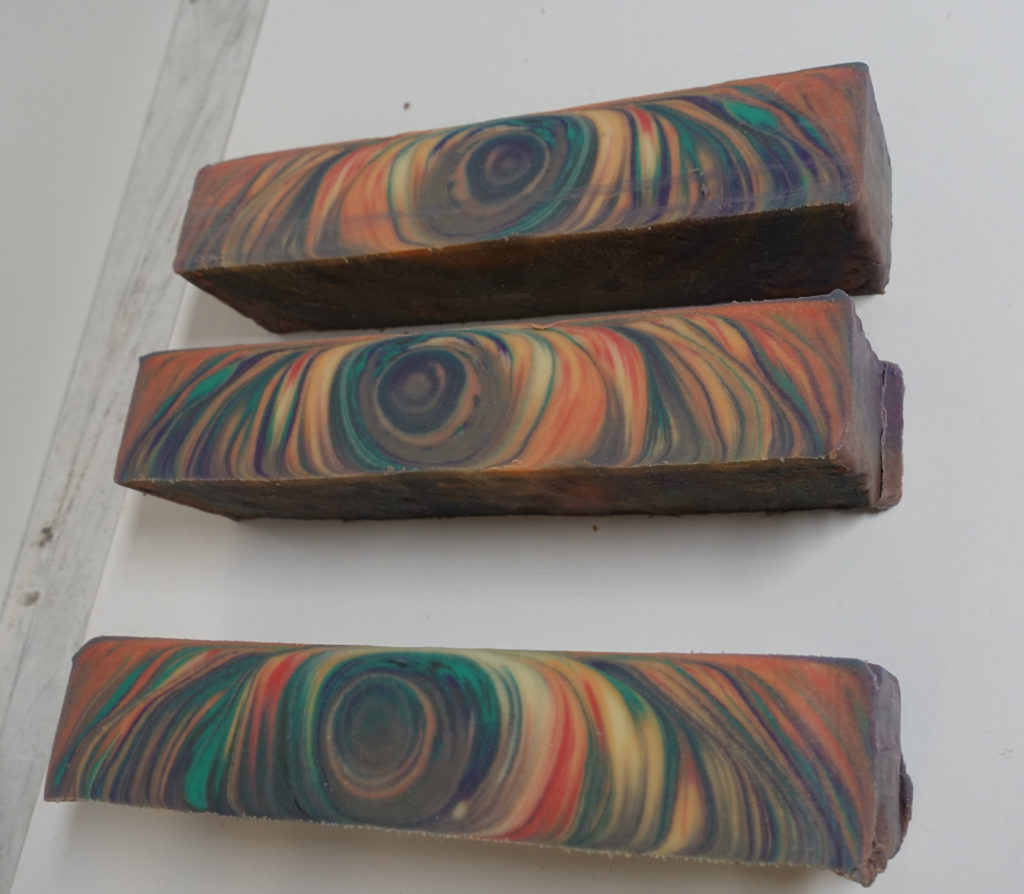
The design and color combination reminded him of Jupiter, thus the soap is called The shores of Jupiter.
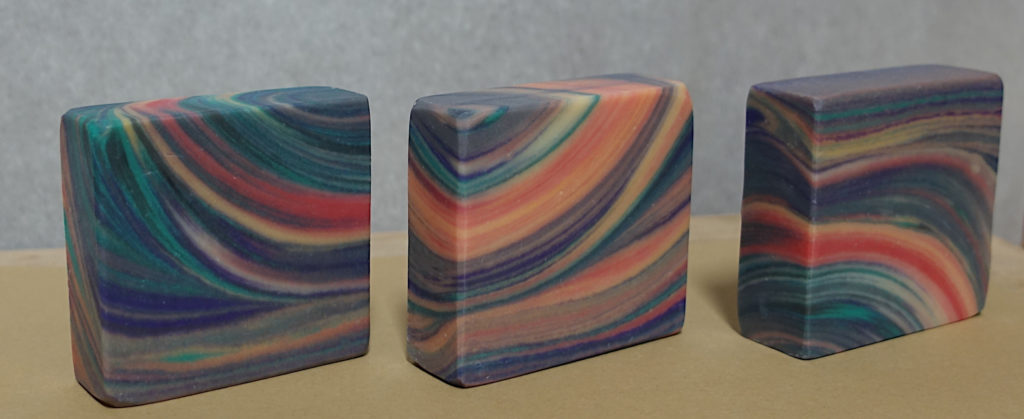

The outcome of my first attempt pleased me very much. It also proved that doing six attempts for the one pot wonder challenge last June (my first soap challenge) really paid off. I got layering and trace just right.
I am always searching for challenges so I decided to do another attempt with another color scheme in the hope of getting a similar beautiful soap and had two batches to enter in the competition.
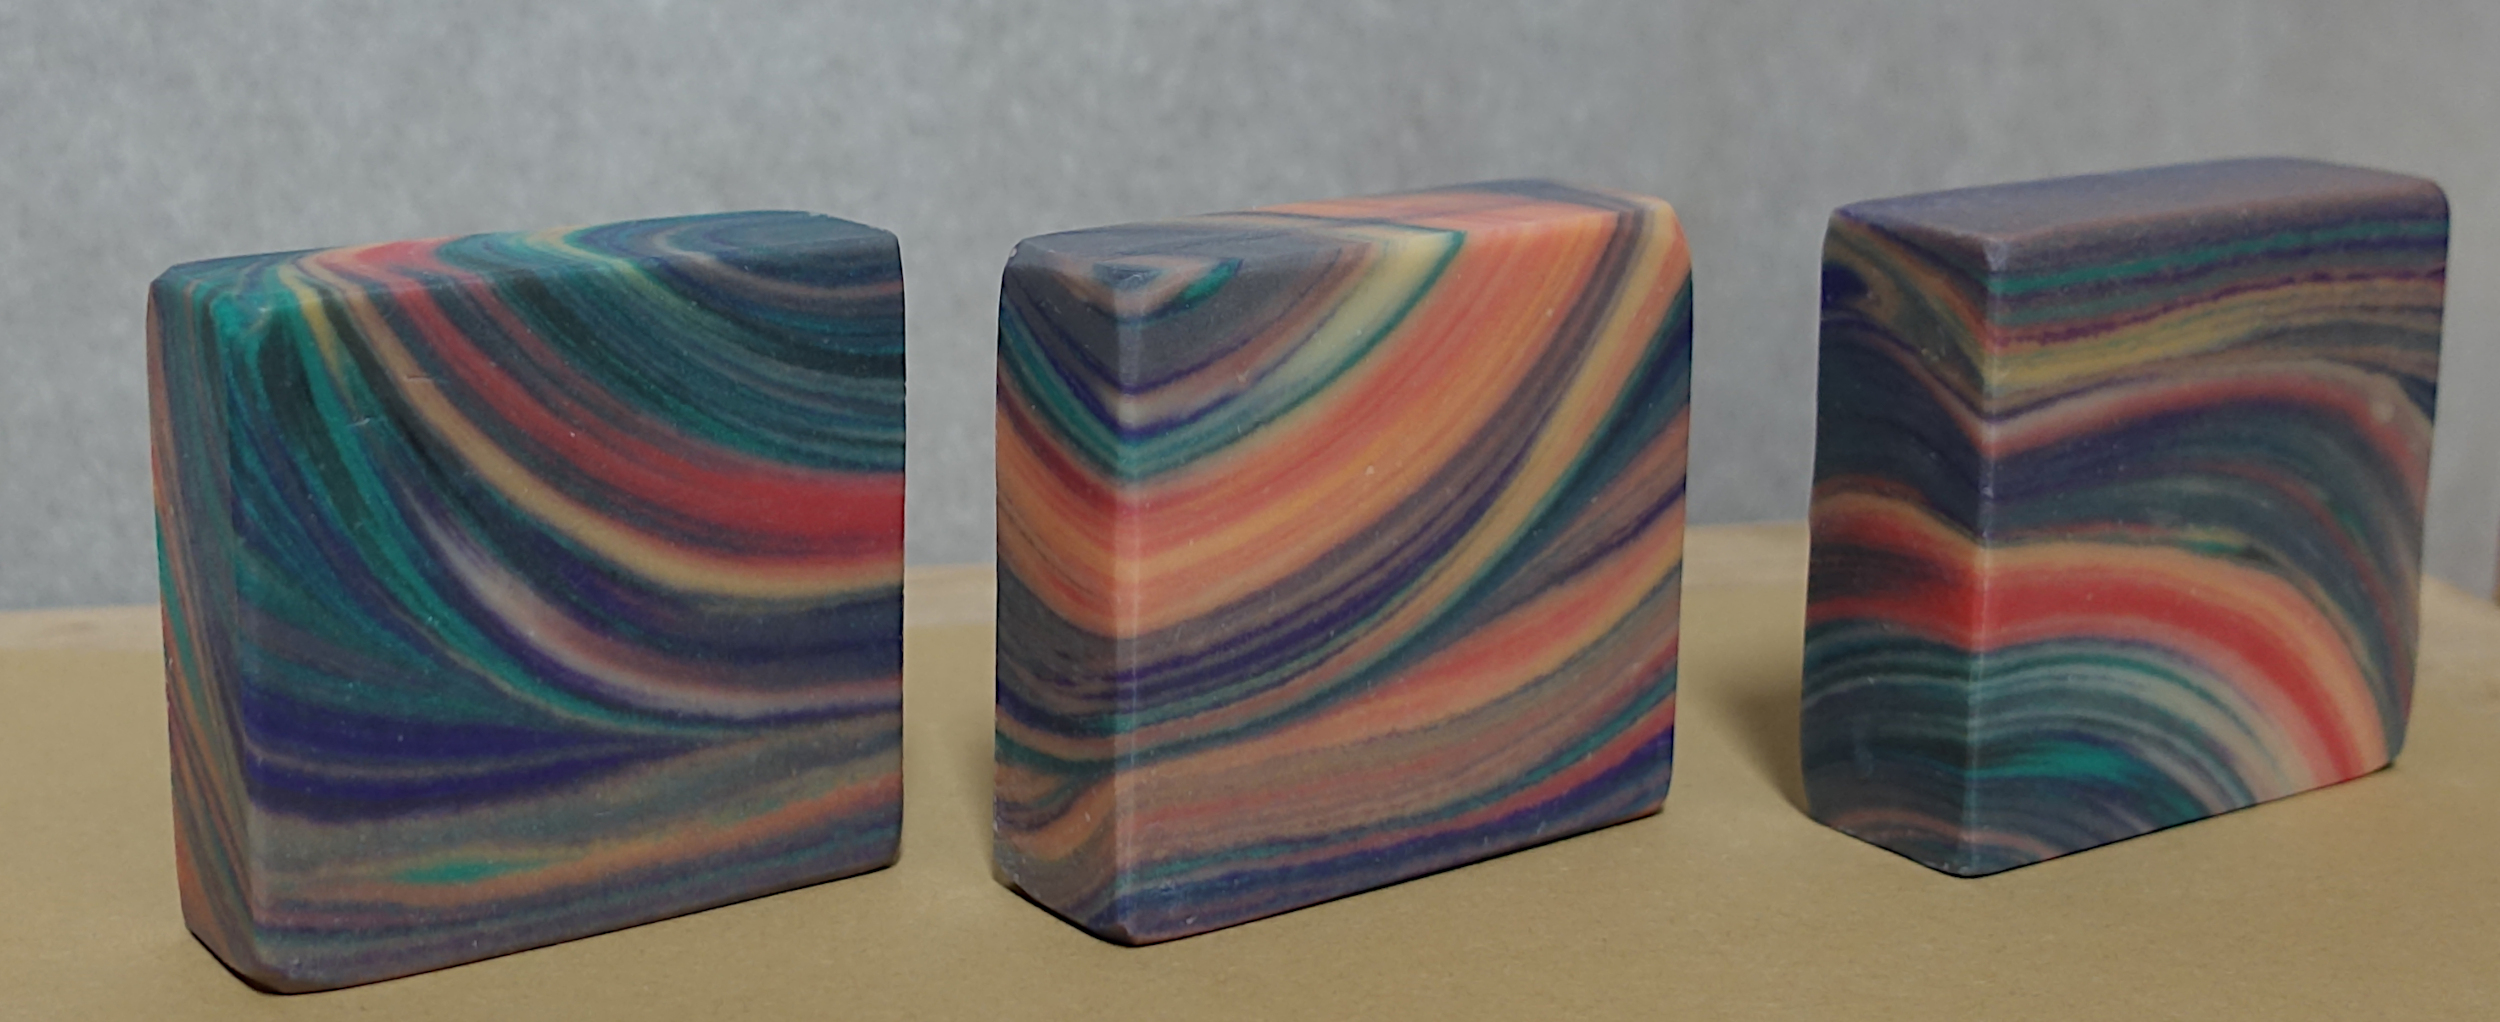
I chose to use another recipe for my second batch which contains a very high amount of solid butters and oils and is moving very fast especially using the heat transfer method (yes, I know why live the easy life?). To counter the behavior of the recipe I used peppermint and spearmint essential oils together with lemongrass to keep my soap fluid a long time.
Once my hard oils where melted in the lye and I added the soft oils i refrained from using the stick blender and just gently stirred and waited for about 10 minutes to reach emulsion.
The colors I used for my second attempt were gold, silver, red, black, aquamarine blue and purple.
For the pour I decided to try the pour from a height, so I stood on a stool.
February seems to be my lucky month, since all went well with my second attempt also.
After cutting the design revealed itself. This attempt also turned out very nice. I decided to name the soap Luma Pools after a region in the video game Ori and the Will of the Wisps. The colors resemble the colors used in the game and I imagine the rivers and pools in said region to be as clear and fresh as the smell of the soap.

I decided to enter Luma Pools in the bonus category I think that the soap is very beautiful and I am looking forward to Summer, when this soap will work perfectly under the shower on a hot day.
Thanks to Amy Warden and Joanne Watkins for hosting this month´s challenge.
I liked using this technique a lot and I absolutely will use it in the future.
Thanks also to the Bubble Support team and all the other soapers in our community for the support, insights and comradeship. I enjoy soaping with all of you!
Last but not least I also thank my dear customers for supporting me by buying my products. Without you, doing this challenges would not be possible as not pnly would I run out of fundings for my material, but also I would end up sitting on a huge pile of soap.

Amazing!!! Just looking at the soap in the mold, I would not have guessed that the soaps were so incredibly beautiful inside! I’m so glad you’ve found a gem of a technique that will serve you well into the future. Also, you must be incredibly strong to pour that much soap at once. Congratulations on TWO beautiful kiss pour soaps, Ute!!
Thanks a lot for your nice comment! I really appreciate, that you take so much time to give feedback every month!
It really was a tough one pouring that much soap (I kept shouting“come on, you got this :)). At first I was really upset because the soap looked so muddy, but I learned that with soap you have to be patient and wait until the cut to really see how it looks like.